Monday, October 27, 2014

a fun little project...

i love, love, love sprinkles! and you know i have the Pinterest board to prove it!
 

in my house sprinkles aren't just used for cakes and or cookies. they have been known to embellish peanut butter toast, which is a staple for my youngest, vanilla yogurt and even bowls of warm oatmeal! it's a fun and colorful little touch that always gets a little squeal of delight when i use them. i now have a teenage son and a 10 year old daughter so i take 'joyful noises' wherever i can get them! ;) i have acquired quite a collection of different shapes and colors. too fun to store up in the cupboards, i've had them on display in cute little painted spice racks on my counter for a while.
 

i love the color of this little green spice rack i thrifted a while back so much that i actually took it in and got it color matched. i now have 'spice rack green' paint on hand! my husband didn't understand why i didn't use it to touch up the rack, but i like the chippy look of it. besides if a painted piece doesn't start out chipped and distressed in my house, it will usually end up that way. ;)

i've been looking for some nicer looking glass bottles to swap out the plastic ones the sprinkles came in. while i am still on the look out, i did find some inexpensive glass salt and pepper shakers that fit into the racks perfectly. while they aren't my favorite, i do think they add to the whim of displaying sprinkles. this weekend i sat down with my oldest son and filled those little glass jars.


it was a fun little project and i am glad that i got to check it off of my "to do" list. as you can see from my first pic i do have another spice rack to fill and believe you me, i do have the sprinkles to fill it! at this point i am just waiting for the store to replenish those little shakers! i did manage to fill the green rack and am enjoying the results! i like to sprinkle -pun totally intended- my "cozy little home" with playful touches and this fits the bill, don't you think?!
 
until next time! ~alanna


Thursday, June 26, 2014

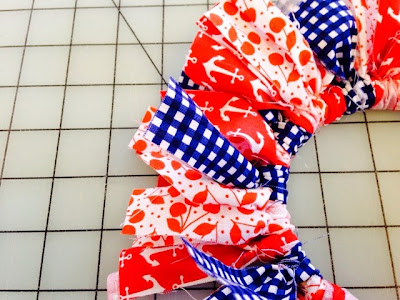
a little patriotic wreath...


one of the things i hear quite a bit when we get a new visitor to the shop is 'ohhh i just love this fabric but i don't sew!' well, good news! there is so much fun to be had with fabric even if you never intend to touch a presser foot! here is a scrappy patriotic wreath for all you that want to get your no-sew craft on with some fabric! just an embroidery hoop, patriotic fabric and a pair of scissors are all that is required to make this super fast, super easy fabric project!

here is the supply list for a 4" (inside diameter) wreath:

one 4" embroidery hoop
3-5 fat eights or 9x21" cuts of fabric (available at mixfabrics.etsy.com)
a pair of scissors
a ruler is optional
to make strips, simply fold the fat eighth in half and cut along the fold to make two 9x11" pieces of fabric. next you can use a ruler or just eye it, and start cutting 1" strips along the length (the 11" side) of the fabric.
this will yield around 18 strips of fabric. repeat for the rest of the fabric. i ended up using three different fabrics and used about 54 strips which achieved the fullness that i wanted with my wreath. 

at this point you are ready start attaching the fabric to your hoop! you can separate the top and bottom of the hoop but i chose to keep them together for easy hanging when it's completed. fold your strips in half and make a loop with the middle, lay your hoop in between it and the tails of your fabric, pull the two tails through the hoop and you are well in your way! 

as you add more strips, you can bunch the fabric strips together to make a fuller wreath, i layered in contrasting fabrics on top of each other and spaced them evenly for desired effect.
i think it would have been fun to add some ribbon and/or ric rac in with the fabric as well, don't you? my finished wreath is enjoying a spot in my merry little fabric shop among the festive fabrics but will probably make it's way into the front of a bicycle or on the side of a wagon on the 4th during our town's bike parade. make sure to visit again for more ways to enjoy using fabric in your no-sew crafty projects! 
til next time!
~alanna

Saturday, May 3, 2014

a little bit of this and a little bit of that...

we just celebrated our 1st year anniversary in our merry little space. just wanted to share a few shots from around the shop!
our "new" vintage cutting tool holder...
some beautiful new book additions...
we finally got a land line for the shop and found this happy little Princess phone just two doors down!

our shipping spot got a splash of fun color with this crocheted garland from Stacey at cottageindustryshop.com.

our color wall is filling up!
my favorite part of the week... happy new
fabric!

very cute and very tasty mini cupcakes my friend Linda brought for our May Day/ 1st year anniversary celebration! thanks again Linda!!

til next time! ~alanna


Wednesday, February 5, 2014

a bit of a theme...

greetings! after some encouragement from one of my super crafty instagram friends angie, who blogs beautifully at oopsiemaizie.blogspot.com, i am determined to try to get over my shyness about blogging.
i know she is busy getting ready to open an etsy shop and after having the pleasure of receiving some of her handmade goodies, i can't wait!
 
 
it took me scrolling through my ig feed to realize that my crafting/sewing projects have had a certain theme to them lately... i guess i am gaga over gingham! especially red! inspired by the #economyblockalong happening on ig right now, i used some of my all time favorite fabric lines 'sew cherry' by lori holt, to try one for the first time. apparently i need to test my sewing machines 1/4" seam allowance because i lost my outer allowance! oops! i can't wait to try it again but for right now i am using it on a little garland above my sewing desk.
 
 
here is a little pendant banner i made for Christmas to hang in mix, my merry little fabric shop. somehow gingham and pom poms seem meant for each other, don't you think?!
 
 
again, inspired on ig, this time by Amanda @whimsiedots, i had a sweet time making this hoop! i found the vintage game letters in her etsy shop whimsiedots.etsy.com. i love her shop and have enjoyed lots of goodies from it!
 
 
here is another hoop i made. using a vintage quilting hoop, more of those vintage game letters, a page from a vintage children's book and a small piece of one of the 'sidewalks'
 coordinates by october aftenoon for riley blake designs, to make this one. it now hangs over the boy's fabric section at mix. 
 
 
my latest gingham-y project is just in time for St. Valentine's day. old book pages, red gingham, of course, bakers twine, a hole punch and some heat-n-bond was all it took for this simple banner. i really like using the purple heat-n-bond to fuse fabric to paper. it doesn't leave the ripples i get using glue and it is super easy to use.
 
 
i ended up making kits for my local customers. these were just as fun to make as the banner itself. funny how that works sometimes!
 
 
i recently stocked a mix of gingham and solids in both my online and brick and mortar shops.  find some red and aqua gingham goodness here.
 
i don't know about you, but i can't wait for friday! i get to help out at my friend linda's kids craft class which she holds in her in her oober cute craft room. i'll be sure to share lots of pics!
 
until next time! ~alanna